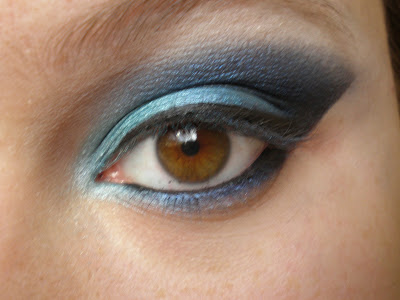
Here's the second look of the We Smoke Skittles Serie, which is basically a serie where I show you tutorials on different colored smokey eyes! We already did the Grape one ( aka purple ) right here : CLICK ME
So, as you might know, there's not an actual blueberry flavored skittle... But how could I passed over a blue smokey eye!?
Here's what the tutorial will show you how to do:
As you can see... My eyebrows are a disaster, but look OVER that. It's a smokey eye with a crisp edge. You could do the same with a more rounded shape by the way! :D
So here we go :
1. Prime your eye with your favorite primer, and add a piece of tape that goes from the outer corner of your eye to your eyebrow.
( I used regular scotch tape and Urban Decay's Primer Potion )
2. Use a dark blue shadow and place it in your crease. Start applying it directly in your crease, and go upward. It'll make the color lighter near the browbone and make it easier to blend.
( I used the dark side of the Sea & Sky mineralize eye shadow duo from MAC )
3. There is two steps in this picture, sorry! First, apply a slightly less darker blue o the outer corner of your lid, and the add a medium blue to the middle of your lid.
( I used MAC FreshWater on the outer corner and Urban Decay's PainKiller on the middle )
4. Take a black eye shadow and put it along the outer edge and directly in the crease. Don't worry for the messiness, we'll clean everything later on!
( I used NYX single eyeshadow in Black )
5. Take a light blue eyeshadow and put it on the inner corner of your eye.
( I used the lighter side of MAC's Sea & Sky mineralize eye shadow duo )
6. Remove the tape and feel the freedom! :) Then take your crease color, your middle-of-the-eyelid color and your inner corner color. Add them in that order from the outer corner of your eye on your lower lash line. It's also the time to clean your brow bone!
( I, again, use MAC's Sea & Sky mineralize shadow and Urban Decay's Painkiller )
7. Add your highlight color on your browbone and line your eyelid and your water line with your favorite eyeliner.
( I used MAC's Blanc Type for my highlight and Buxom Lash Liner in Leatherette as my liner )
8. Curl your lashes and add mascara! Then we're DONE!
( I used... I don't remember what I used! Sorry! D: )
Paired with this, I used Revlon ColorBurst Lipstick in Soft Nude and MAC Dazzle Glassin Local Color!
I hope you liked this tutorial! Next up in this serie is Lime, aka the green smoky eye! :) Are you exited!? :O
I'll have a new post in the next few days, about my november favorites!
Thanks for reading lovely followers,
Mariie~~
( By the way, I have some prizes comming in the mail.. you know what that means, right ? )


gorgeous look, you did such a great job!
ReplyDeleteI love it. I love how its all laid out for us too. I have never tried using tape like that I will have to give it a shot. I also love the nude lip and was happy when I saw it is Revlon's Soft Nude because I actually own it.
ReplyDeletexx
Alicia
you tell me that I am good, well you're pretty much amazing with make-up! I don't copy that from you hahahaha! I probably would even fail applying the tape to my eye XD...
ReplyDeleteWell you can buy China Glaze @ Transdesign.com :) Hopefully that helped!
x0x0
that looks so pretty :) thanks for the steps :)
ReplyDeletejust discovered your blog....you are really creative!
ReplyDeletex
daretounravel.blogspot.com